Make The background and figure outlines
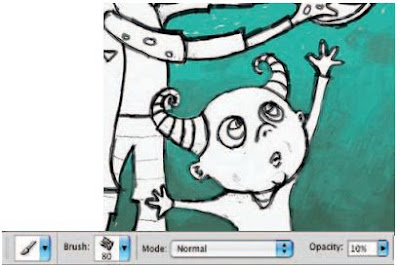
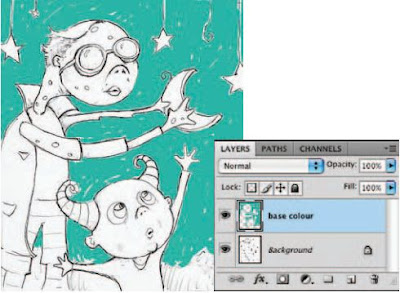 5 Target your new layer in the Layers palette and begin to paint a series of strokes on the new layer. Focus on areas that are the background, as indicated in the sketch. Just start painting some strokes; don’t cover the line work of the sketch on the underlying layer; and allow a little white to show through between strokes here and there. Also, increase and decrease the brush diameter in the Brushes palette to accommodate different regions on the canvas. For open areas of the background, use a brush of very large diameter; for tighter regions, such as between the small figure’s fingers, use a brush of much smaller diameter.
 6 Choose a different color from either the picker or one of your own custom swatches and paint the background area at the bottom of the canvas. When you’refinished, choose a black foreground color and create a new layer in the Layers palette. Target the new layer and use the brush to begin tracing the black outlines of the underlying sketch on this new layer. Reduce the opacity of your brush in the Tool Options bar to 50% so that there is a translucent effect as you paint small strokes over the top of each other.
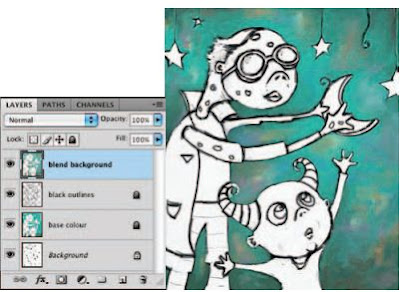
 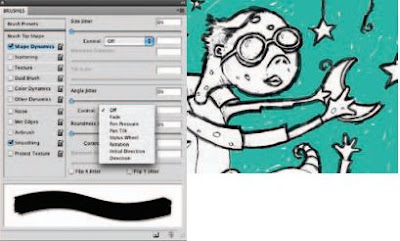 7 Click on the Brush Tip Shape option from the left in the Brushes palette. Use this area often to vary the angle of the brush as you paint. You’ll need to tweak the angle frequently when painting around areas such as the heads of these creatures. If you don’t adjust the angle at times, there will be areas where the strokes appear too thin compared to others. Click on Shape Dynamics in the Brushes palette to enable Shape Dynamics and then on the Angle Jitter Control menu to view the options.
 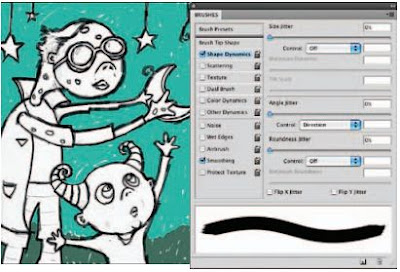 8 Choose the Direction option from the Control menu, but leave the angle jitter amount set to 0. This setting causes your brush to base the angle of the brush tip on the directions of your stroke as you paint them. Because we still want a somewhat smooth edge to the strokes, the amount is set to 0. The more you increase the amount, the rougher the edges of the strokes will appear. By simply enabling the Shape Dynamic function, you can save yourself the trouble of having to constantly adjust the angle as you paint. Finish painting the black outline.
 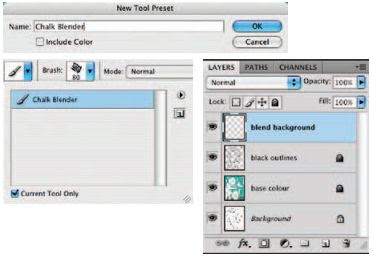 9 Reduce the opacity of your brush to 25% and then open the Tool Preset picker at the far left of the Tool Options bar. Click on the Create New Tool Preset button. When you are prompted, name the tool “ Chalk Blender. ” Disable the Include Color option and click OK. This brush is now added to the preset picker, with all of the Brushes palette options and dynamic functions intact. You can access it directly from the preset picker from now on. Create a new layer in the Layers palette and ensure that it is targeted.
 10 Use your current brush, set to 25% opacity, to blend the background fill colors together on the new layer; this is precisely why we named the preset “ Chalk Blender. ” Start by painting strokes over the areas where light and dark colors meet. Paint dark strokes over light areas, and vice versa. Go back and forth painting like this until colors begin to blend together. Change the direction of your brush strokes often as well as the size of your brush tip. Also, if using an opacity of 25% does not give you a blend effect that is as smooth as you’d like, try reducing it when necessary.
 11 Now add different colors from the Swatches palette into the background here and there, using the same brush on the current layer. Try initially adding them using a higher brush opacity setting, and then blending them into the background using lower opacity settings. A quick way to work is to Alt(PC)/Option(Mac)-click on areas of the canvas to sample color rather than always returning to the Swatches palette. This technique is especially useful when blending as you can sample “ in-between ” colors. Using this method, if you happen to sample a foreground color that you like, feel free to add it to the Swatches palette so that you can access it later.
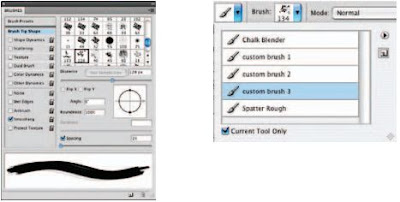
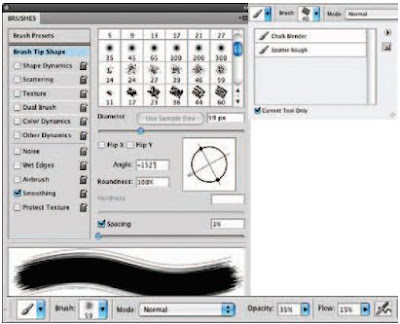 12 In the Brush presets section of the Brushes palette, select the spatter 59 pixels Brush Tip preset. Now, in the Brush Tip Shape section of the Brushes palette, adjust the angle of the brush tip until you’ve achieved the roughest looking stroke possible. In the Tool Options bar, set the opacity of the brush to 35% and the flow value to 15%. Save this new brush as a tool preset and name it Spatter Rough.
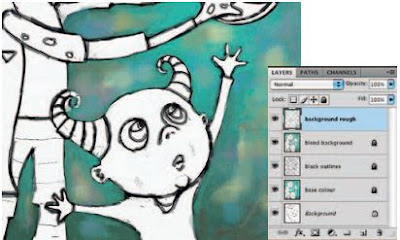 13 Create a new layer and use your newly created tool preset to paint over areas of the canvas on this layer. Increase or decrease the opacity as required and use colors from the canvas or the Swatches palette. The goal here is to paint with the new brush over areas that look very smooth. Because of the brush tip and very low flow setting, the resulting strokes will add a rougher, more textured feeling to the areas you paint. Using large brush strokes and bold colors will pronounce the rough effect. Use this effect sparingly as it can tend to overpower an illustration.
 14 Open up the brush1.jpg file. Choose Edit > Define Brush preset from the menu. Name your brush and return to the working file. Choose your new custom brush tip from the end of the list in the Brush Presets section of the Brushes palette. In the Brush Tip Shape section of the Brushes palette, set the spacing to 1. In the Tool Options bar, set the opacity to 50% and the flow to 15%. Save this brush as a new tool preset. Use this same method to open up brush2. jpg and brush3.jpg and save them as new tool presets, using the same spacing, opacity, and flow settings.
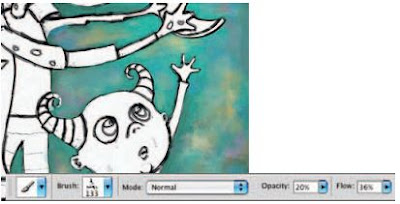 15 Now that you have added three new custom brushes and a new dual brush to the Tool Preset picker, use them to paint some rough strokes on this layer. Just because the presets contain embedded settings for opacity and flow, that doesn’t mean that you can’t change them each time you use them. Use a variety of colors, brush sizes, opacity, and flow settings to introduce some very real and tactile feeling brush strokes on the current layer. Again, ensure that you do not overdo it as these new brushes, which produce such distinct strokes, can visually overpower the softly blended background quite easily.
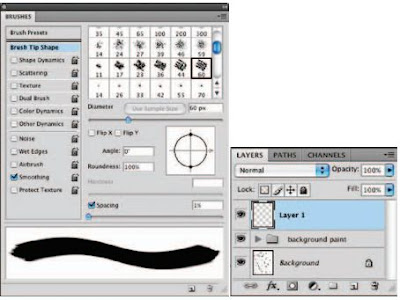 16 When you’re finished, target the top layer and then Shift-click on the layer directly above the background layer in the Layers palette. This will target all of your paint layers. Choose Layer > N e w > Group From Layers from the menu to add them to a group. Because we’re going to start painting the other image components, this grouping of layers will help us keep things separate and organized. Create a new layer for the base color of the figures. In the Brushes palette, choose one of the default chalk brush tip presets. Ensure that Smoothing is enabled, and in the Brush Tip Shape section of the palette, reduce the spacing amount to 1.
 5 Target your new layer in the Layers palette and begin to paint a series of strokes on the new layer. Focus on areas that are the background, as indicated in the sketch. Just start painting some strokes; don’t cover the line work of the sketch on the underlying layer; and allow a little white to show through between strokes here and there. Also, increase and decrease the brush diameter in the Brushes palette to accommodate different regions on the canvas. For open areas of the background, use a brush of very large diameter; for tighter regions, such as between the small figure’s fingers, use a brush of much smaller diameter.
 6 Choose a different color from either the picker or one of your own custom swatches and paint the background area at the bottom of the canvas. When you’refinished, choose a black foreground color and create a new layer in the Layers palette. Target the new layer and use the brush to begin tracing the black outlines of the underlying sketch on this new layer. Reduce the opacity of your brush in the Tool Options bar to 50% so that there is a translucent effect as you paint small strokes over the top of each other.
 7 Click on the Brush Tip Shape option from the left in the Brushes palette. Use this area often to vary the angle of the brush as you paint. You’ll need to tweak the angle frequently when painting around areas such as the heads of these creatures. If you don’t adjust the angle at times, there will be areas where the strokes appear too thin compared to others. Click on Shape Dynamics in the Brushes palette to enable Shape Dynamics and then on the Angle Jitter Control menu to view the options.
 8 Choose the Direction option from the Control menu, but leave the angle jitter amount set to 0. This setting causes your brush to base the angle of the brush tip on the directions of your stroke as you paint them. Because we still want a somewhat smooth edge to the strokes, the amount is set to 0. The more you increase the amount, the rougher the edges of the strokes will appear. By simply enabling the Shape Dynamic function, you can save yourself the trouble of having to constantly adjust the angle as you paint. Finish painting the black outline.
 9 Reduce the opacity of your brush to 25% and then open the Tool Preset picker at the far left of the Tool Options bar. Click on the Create New Tool Preset button. When you are prompted, name the tool “ Chalk Blender. ” Disable the Include Color option and click OK. This brush is now added to the preset picker, with all of the Brushes palette options and dynamic functions intact. You can access it directly from the preset picker from now on. Create a new layer in the Layers palette and ensure that it is targeted.
 10 Use your current brush, set to 25% opacity, to blend the background fill colors together on the new layer; this is precisely why we named the preset “ Chalk Blender. ” Start by painting strokes over the areas where light and dark colors meet. Paint dark strokes over light areas, and vice versa. Go back and forth painting like this until colors begin to blend together. Change the direction of your brush strokes often as well as the size of your brush tip. Also, if using an opacity of 25% does not give you a blend effect that is as smooth as you’d like, try reducing it when necessary.
 11 Now add different colors from the Swatches palette into the background here and there, using the same brush on the current layer. Try initially adding them using a higher brush opacity setting, and then blending them into the background using lower opacity settings. A quick way to work is to Alt(PC)/Option(Mac)-click on areas of the canvas to sample color rather than always returning to the Swatches palette. This technique is especially useful when blending as you can sample “ in-between ” colors. Using this method, if you happen to sample a foreground color that you like, feel free to add it to the Swatches palette so that you can access it later.
 12 In the Brush presets section of the Brushes palette, select the spatter 59 pixels Brush Tip preset. Now, in the Brush Tip Shape section of the Brushes palette, adjust the angle of the brush tip until you’ve achieved the roughest looking stroke possible. In the Tool Options bar, set the opacity of the brush to 35% and the flow value to 15%. Save this new brush as a tool preset and name it Spatter Rough.
 13 Create a new layer and use your newly created tool preset to paint over areas of the canvas on this layer. Increase or decrease the opacity as required and use colors from the canvas or the Swatches palette. The goal here is to paint with the new brush over areas that look very smooth. Because of the brush tip and very low flow setting, the resulting strokes will add a rougher, more textured feeling to the areas you paint. Using large brush strokes and bold colors will pronounce the rough effect. Use this effect sparingly as it can tend to overpower an illustration.
 14 Open up the brush1.jpg file. Choose Edit > Define Brush preset from the menu. Name your brush and return to the working file. Choose your new custom brush tip from the end of the list in the Brush Presets section of the Brushes palette. In the Brush Tip Shape section of the Brushes palette, set the spacing to 1. In the Tool Options bar, set the opacity to 50% and the flow to 15%. Save this brush as a new tool preset. Use this same method to open up brush2. jpg and brush3.jpg and save them as new tool presets, using the same spacing, opacity, and flow settings.
 15 Now that you have added three new custom brushes and a new dual brush to the Tool Preset picker, use them to paint some rough strokes on this layer. Just because the presets contain embedded settings for opacity and flow, that doesn’t mean that you can’t change them each time you use them. Use a variety of colors, brush sizes, opacity, and flow settings to introduce some very real and tactile feeling brush strokes on the current layer. Again, ensure that you do not overdo it as these new brushes, which produce such distinct strokes, can visually overpower the softly blended background quite easily.
 16 When you’re finished, target the top layer and then Shift-click on the layer directly above the background layer in the Layers palette. This will target all of your paint layers. Choose Layer > N e w > Group From Layers from the menu to add them to a group. Because we’re going to start painting the other image components, this grouping of layers will help us keep things separate and organized. Create a new layer for the base color of the figures. In the Brushes palette, choose one of the default chalk brush tip presets. Ensure that Smoothing is enabled, and in the Brush Tip Shape section of the palette, reduce the spacing amount to 1.
No comments:
Post a Comment